Home Improvement/Repair Questions

Professional Engineer & PE Exam Forum

Help Support Professional Engineer & PE Exam Forum:

This site may earn a commission from merchant affiliate links, including eBay, Amazon, and others.
We have the cordless dewalt stuff. drill circular saw, leaf blower, flash light, and something else I don't remember.  It works for our purposes

 
I wish I could give one a try before I buy - I was thinking about getting the dewalt one just because I already have 3- 20V batteries - and then pick up a cheapo one with a cord for infrequent uses when I need "more power"

 When I did my above garage shelves that was a lot of drilling and such and it went all day on one charge (thats what she said) - but I know the circ saw is going to draw a little more power - I'm not looking to frame a house or anything, - I found some 2X12's under my deck that are surprisingly in good condition and I am going to make some of those adiirondack ski chairs with them - I figure it will be 20-30  "cuts" per chair? 
One of the reasons I've stuck with Ryobi is because I've got the batteries. They're kind of like the "air compressor" for cordless tools. Once you've got batteries you can actually find the tools fairly cheap if you look around because places will sell refurbished ones without the batteries. It's like the air tools, once if you've already got the compressor, the tools can actually be had fairly cheap.

My circular saw isn't the best anymore, but I think it is more of matter of needing a new blade more than anything.

 
Last edited by a moderator:
Didn't Ryobi get into the lawn care market too?  I think I recall seeing a bunch of there stuff - I also rarely use a weed eater because its a pain (& I buy the pre mix gas they sell) - but for my size lawn I could probably totally get a cordless one - 

I used to be a big fan of porter cable, but they seem to have died off - I picked up a new dewalt drill they had on sale at xmas for $99 bucks and its been pretty nice - I hadnt been a big fan of them from my home depot days, but that was mainly because there sales people were dicks

 
Ryobi is meh.  I got their impact and battery combo when it was on sale a while back and overall it's solid.  Their weedeater and leaf blower are not impressive, but more than do the job for our small needs.  Their recip saw, good grief, it was good while it lasted.  Built my deck with it, but died right after.  Got it refurbed (had to pay shipping) and it broke again.  I'll pay extra for quality from here on out.

 
So I’ve been working on a thing. I wanted to get the smoker out of the garage but wanted to keep it protected from the elements since it’s electric so I made me a miniature (~6’ tall) outhouse. Still not finished, got a few bits of trim to do and figure out what I want to do for the door handle, but figured it was close enough....

Got all fancy and did a drawer for the smoker to sit on and found a f-to-m connector at, of all places, Cabelas so it’s got a place to plug the female end of an extension cord In on the back and then plug the other end in like normal. 

5D7B3D9B-FEEE-405B-93FB-B62850AD6687.jpeg

1079685C-28CA-426F-832B-81B0C3B30A29.jpeg

 
Last edited by a moderator:
So I ended up getting the Dewalt cordless circ saw (the 6-1/2” blade version)

Guy at Lowe’s was like bring it back if you don’t like it.

Pretty happy with it. I had a bunch of scrap lumber from the basement and other projects and made 2 Adirondack / ski chairs - made at least 20+ cuts, (about half pressure treated wood) and the thing worked like a champ - it struggled a little on cross cuts , but it was still going strong on the last cuts of the day.

Since I also had my table saw out (I had to rip some of the 2X8’s to make 2X4’s)- but it was Defin njce to have one less cord around.

I’m gonna grab another battery so I’ll have at least 3- usually have the one going in the drill so it would be nice to have one available to charge...

 
I love all my cordless stuff.

I have an eGO weed trimmer, leaf blower, and hedge trimmer. Two batteries are part of that - at high power I could get about 30 minutes on the weed trimmer. I needed the extra battery because I had a quarter acre of dandelions in the back of our property in Alaska. But I could easily complete the trimming on the regular lawn with one battery. The big plus was I didn't go deaf doing it like with the gas powered trimmer, and like others have said it was so much more convenient - just insert the battery and go. 

The weird thing with the leaf blower is that when I would use it to blow snow off the deck, I would get shocked if I found myself enveloped in a large enough cloud of ice. Not painful or deadly (based purely on the fact that I am still here!), but still a little unnerving. And even weirder, I would feel the shock in my heavily gloved hands. I'm not an EE so I am not entirely sure what was going on there...

I have all Makita cordless tools. I bought the more expensive brushless versions of the drill and driver, supposedly that gives 25% longer battery life (??). This weekend I used my cordless oscillating multitool to grind out the grout between 11 24x24 floor tiles. Worked great - I started with one battery with half charge and got almost all of them, and just switched batteries to finish.

 
Last edited by a moderator:
Two words: Milwaukee Fuel

Power cords are so last decade.  So far, I have converted to cordless for the following:

Sawzall, circular saw (7-1/4 inch), 1/2 inch drill/hammer drill, 1/2 inch impact wrench, 1/4 inch impact driver, LED work light.  All in 18 volt with brushless motors.

3/8 inch drill and 1/4" impact driver.  Both in 12-volt brushless

With 3 batteries and a pair of chargers, I haven't managed to drain a battery without having a fully charged one ready to go.  That little 3/8" M12 drill is the handiest **** thing I've purchased in the last couple of years.

 
I'm kind of the opposite of you all--the only battery powered tool I have is a drill.  Corded tend to be more powerful and cheaper, and I'm a cheap ass.

 
i am just not a fan of dragging a cord around for a power tool if there is another option (aside from the larger power tools) - We do the "leaf vaccum" thing here in Co and I got sick of the electric version (which sucked) and ordered a gas one - not only is it "more power" it has a larger bag so my kids can vacuum up the leaves in the fall in like half the time ;)

But I do love my pneumatic tools...

 
I'm kind of the opposite of you all--the only battery powered tool I have is a drill.  Corded tend to be more powerful and cheaper, and I'm a cheap ass.
Same here.  Lot of the stuff I bought a long time ago still works fine.  Maybe when they stop working, I'll switch over.

I have a cordless weed trimmer and hedge clipper.  The hedge clipper still works fine but the weed trimmer not so much - it never had enough power.  I replaced it with a Stihl FS90R.  It has a 4 stroke engine, but still have to mix the gas and oil.  Works great.

 
i am just not a fan of dragging a cord around for a power tool if there is another option (aside from the larger power tools) - We do the "leaf vaccum" thing here in Co and I got sick of the electric version (which sucked) and ordered a gas one - not only is it "more power" it has a larger bag so my kids can vacuum up the leaves in the fall in like half the time ;)

But I do love my pneumatic tools...
My neighborhood got together and bought a Little Wonder leaf vac.  The thing is a monster.  You don't want to run it without hearing protection.  It probably saved me days of leaf blowing and raking last fall. 

 
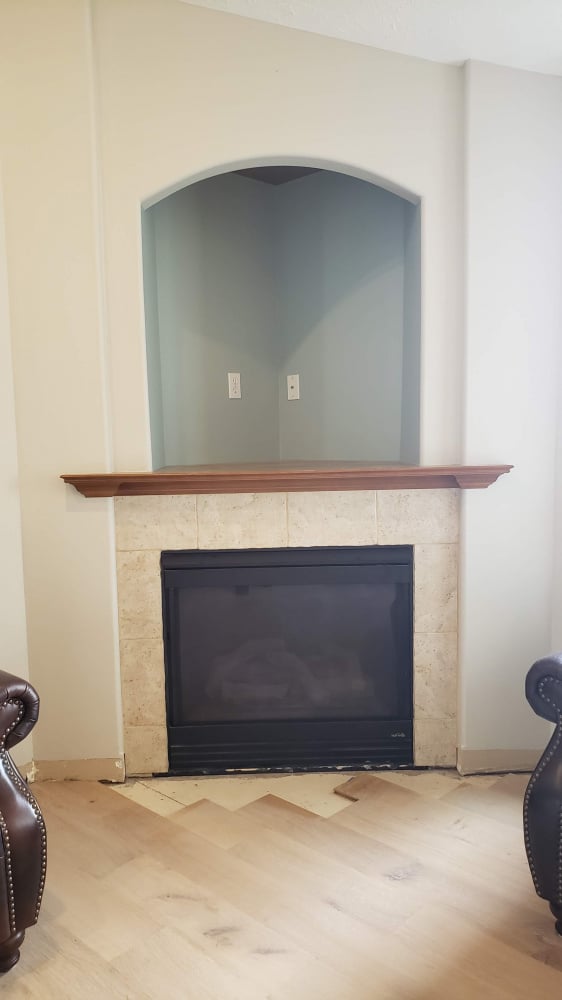
The last few days my wife and I have gotten a ton done on our fireplace remodel. My wife wanted a new mantle for the fireplace because the one that came with this home when we bought the place was pretty wimpy. So I promised her I would do that upgrade as her birthday present this year. We went and bought the 8x8x96 beam on her birthday (end of May), and we are just now getting noticeable progress completed. This lil project has required the use of every power tool I own, save for my planer and joiner!  I've used:
Drills
Nail guns
mitre saw
skill saw
radial arm saw
table saw
router
band saw
sawz all
jig saw
Disc sander
palm sander
random orbital sander
and eventually I will use my tile saw
I am just about spent on this project!  
 
9egexvym0622.jpg

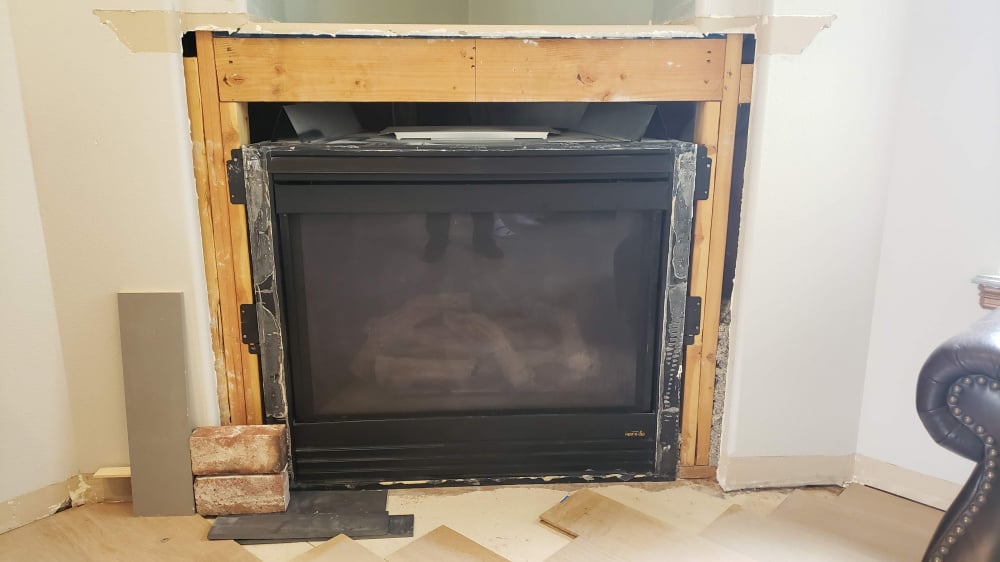
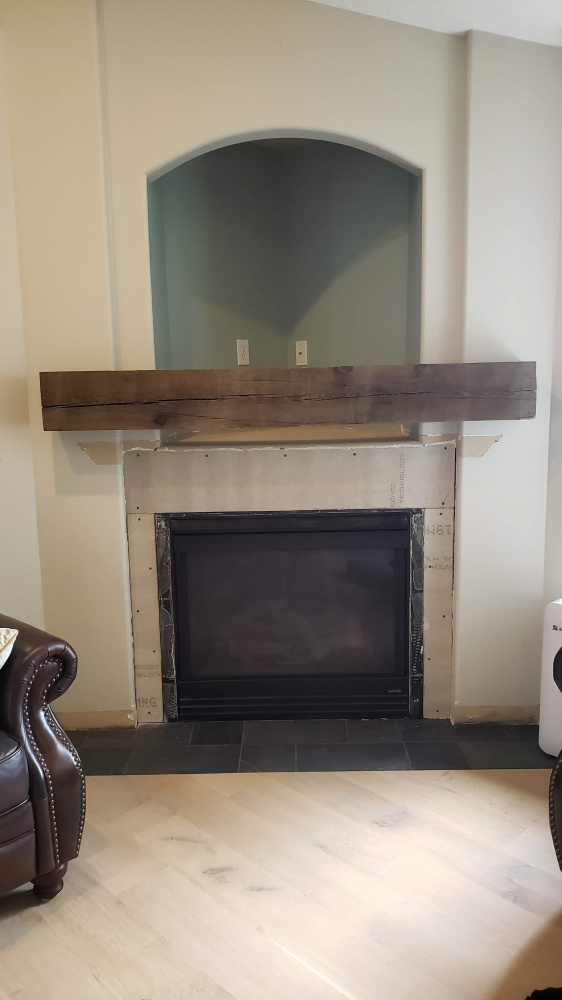
To kick off the project, we pulled all the old tile and backer board off of the surround. With that, also came the old mantle piece and the shelf board (which was basically one piece with some trim below it to create a mantle-- pathetic!).
is72jnr2fcle.jpg

I got the backer board up and had our kitchen remodeling contractor lay the hearth tile (it was part of his project already since he was laying this slate in other areas-- that project is a whole 'nuther thread).
zisx7fev7k0q.jpg

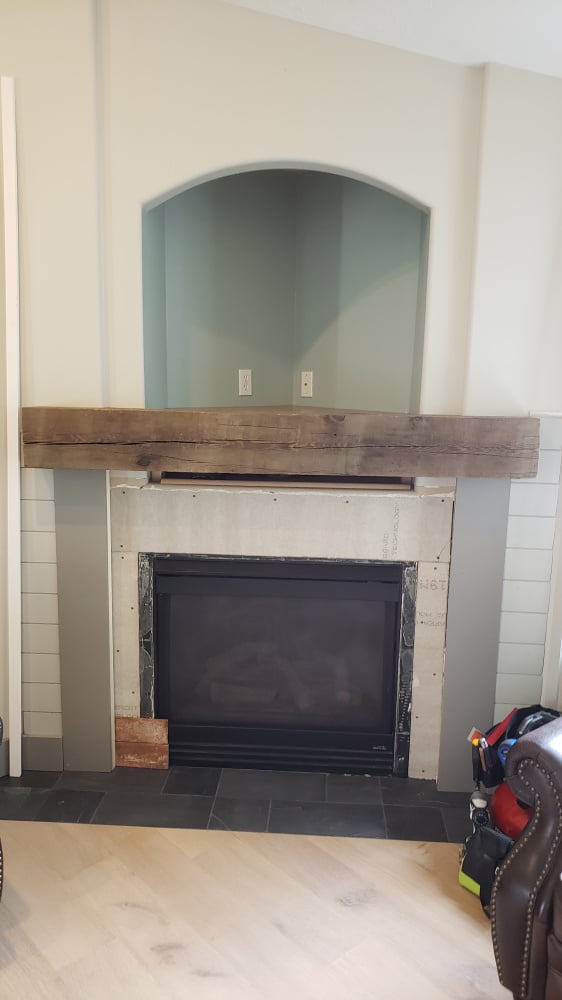
Next came the mantle piece. There was a ton of prep work to do on the mantle piece itself just to get it ready to install. It juts back into that ~2.5" wall recess, so that meant removal of a bunch of material from the ends. When it came to working with this beam the main problem was, of course, that I don't have anything that can make a clean cut through 8" material (the sawz-all can, but it doesn't make clean cuts, or at least I don't have the skill to with it). I had planned to use my band saw for the main cuts (cutting to length and to cut the end recesses, but when I went to use it, I discovered it only has a 5" opening!  So I had to get creative and used a few different cuts from various sides (my father chided me for not using a hand saw, but he is apparently unfamiliar with my skill using one). We decided to try to keep one end in it's natural state, so the end on the right is a little bit rougher cut and is of course naturally weathered. On the cut end (the left end in these pics), my wife mixed some stain up that made it match the natural weathered look and her match is amazing!  Next came the mounting. We'd read that one of the best ways to hang a beam like this on the wall, is to mount a 2x4 to the wall, and make a pocket in the back of the beam for it.  That required a bunch of router work, as well as multiple passes with my skill saw (in retrospect, a nice stacked dado blade would have saved some time, but I don't have one and it was another $100 expense this project didn't need). The nice thing about this method for this project, is I was able to attach the beam to the wall mounted 2x4 from the back, so there are no fasteners showing at the front. Note that if you don't have access to the back and still want the no-fastener look, you can just keep your pocket tight and glue it, but that requires a bit of fixturing while the glue sets. Either way, the joint is very strong.
5kl46oubzrdo.jpg


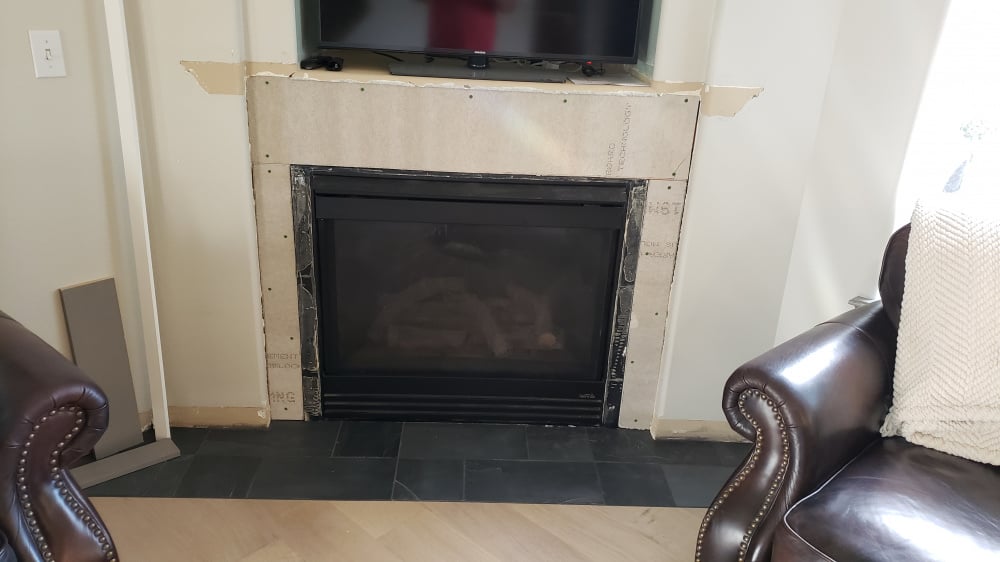
Next came some of the detail work around it. I took the old shelf board, cut the front off of it so it would fit in behind the new mantle piece, and raised it up to the new height. It's actually set down about 3/4" below the top of the mantle piece to help hide it, since it's different material and finish than the mantle. We may just end up painting it, but this keeps it out of sight either way. My wife had found a picture she wanted to emulate that included some shiplap in the surround, so the last couple days have been spent installing that.
j6ww9lyjc5wp.jpg

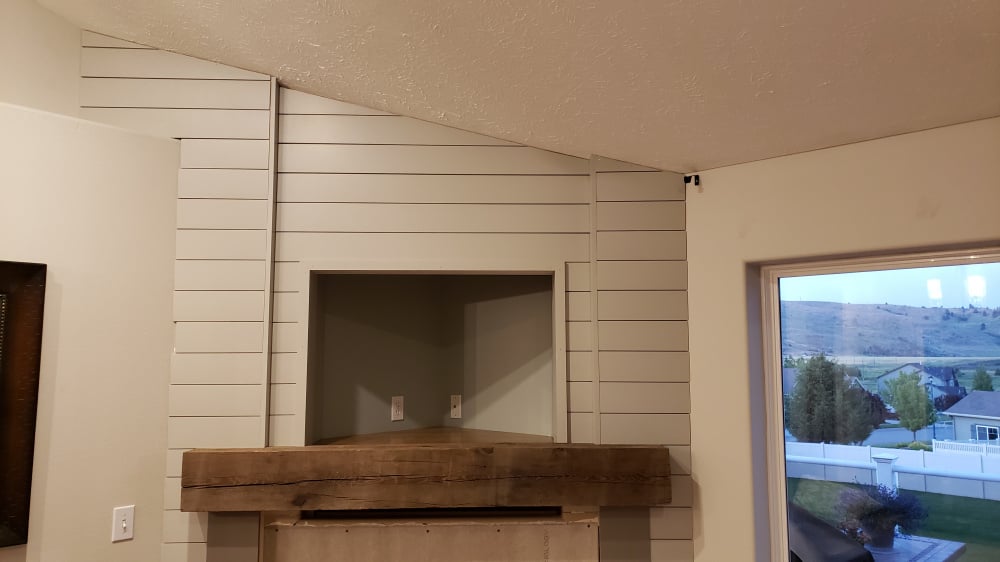
Keeping the arch was going to be beyond the scope of what I wanted to do for this project because it's so time consuming to notch a board and soak it to get it to curl, plus this arch is the only arch in the entire home, making it a bit out of place. So I boxed in a new frame and ran the ship-lap over the arch.  I will add some doors to that opening, eventually.
 
2obn5ixnjlys.jpg

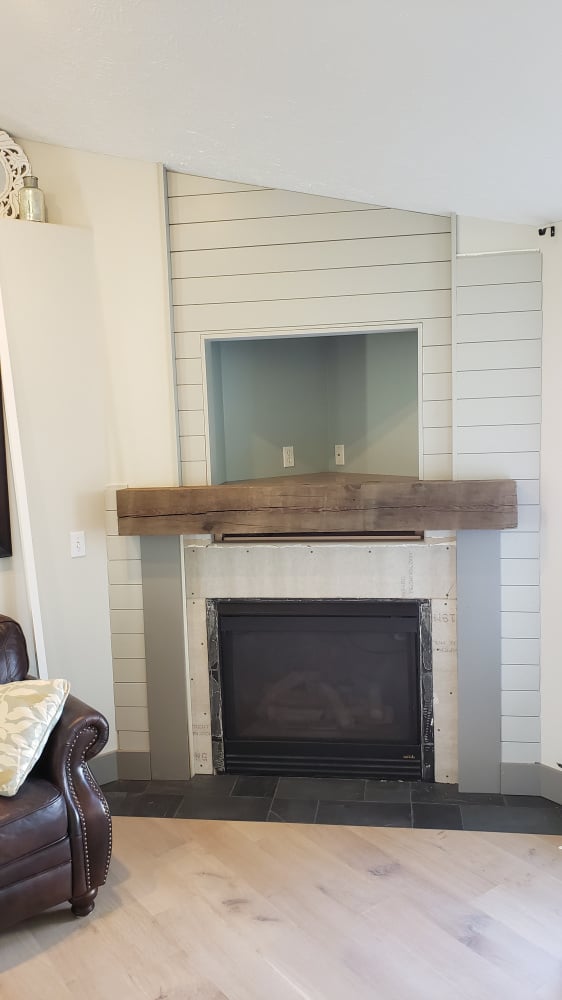
The last tricky part of this project has been the fact exactly nothing is square or level and the upper left portion of the left wall area isn't co-planar where it juts back across the wall shelf. There isn't a clean way to break between that area above the wall shelf and the rest of the wall, which I hadn't discovered until I went to run the trim up the left side. There was going to be a huge gap between either the terminus strip I would run at the end of the shiplap in that area, or the shiplap on the right, and likely both.  As luck would have it, the shiplap piece that runs back into that area fits tight to the top of the wall shelf, so I just ran it back to the other corner.  When I put my trim up on that side, it will just stop short as the top of the wall shelf (and will cover up the raggedness of the boards on that side).
bypjxhs07fa0.jpg

krf8pfctck5u.jpg

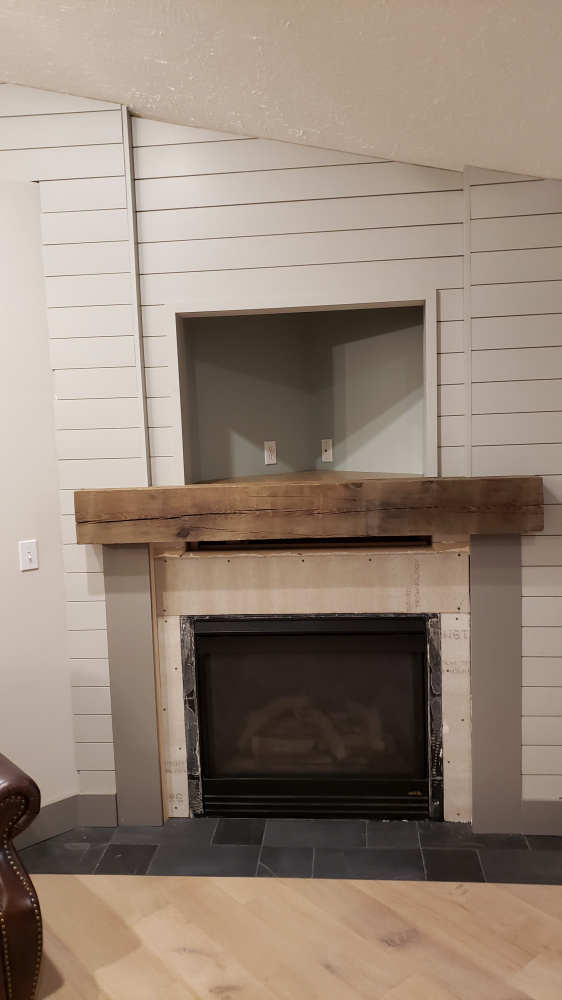
We still have the tile to set, which will be the antique brick that's been cut down to tile thickness that you can see in a couple of the earlier pictures. I still have some trim to install at the edges and above where the tile will go above the fireplace, and then there will be some corbels added where the "legs" meet the mantle, as well as a couple plinth blocks and another trim board that will give the legs some more dimension.  Thankfully, my wife has volunteered to do all of the painting, because as challenging as some aspects of this project have been, painting is the thing I hate the most. Plus, she's a much better painter than I.
 
 
Looks good.  We were contemplating doing something similar to our fireplace with the shiplap and mantle, albeit with flat walls and no recess to deal with.  We have a pretty dated looking late 90's beige-ish marble surround and standard white big box store overly-busy looking mantle.

 
Back
Top